8 May 2026
Designing a small bathroom comes down to thoughtful planning and well-considered tile choices. The right combination of tile size, layout and finish can make a compact space feel brighter, more open and easier to maintain, using principles such as continuity, light reflection and scale to enhance a sense of space without changing the room’s actual footprint.
With these design considerations in place, even small bathrooms can feel both highly functional and visually appealing. This guide brings together proven tile ideas and practical guidance to help you make the most of your space and create a bathroom that feels like a standout feature in your home.
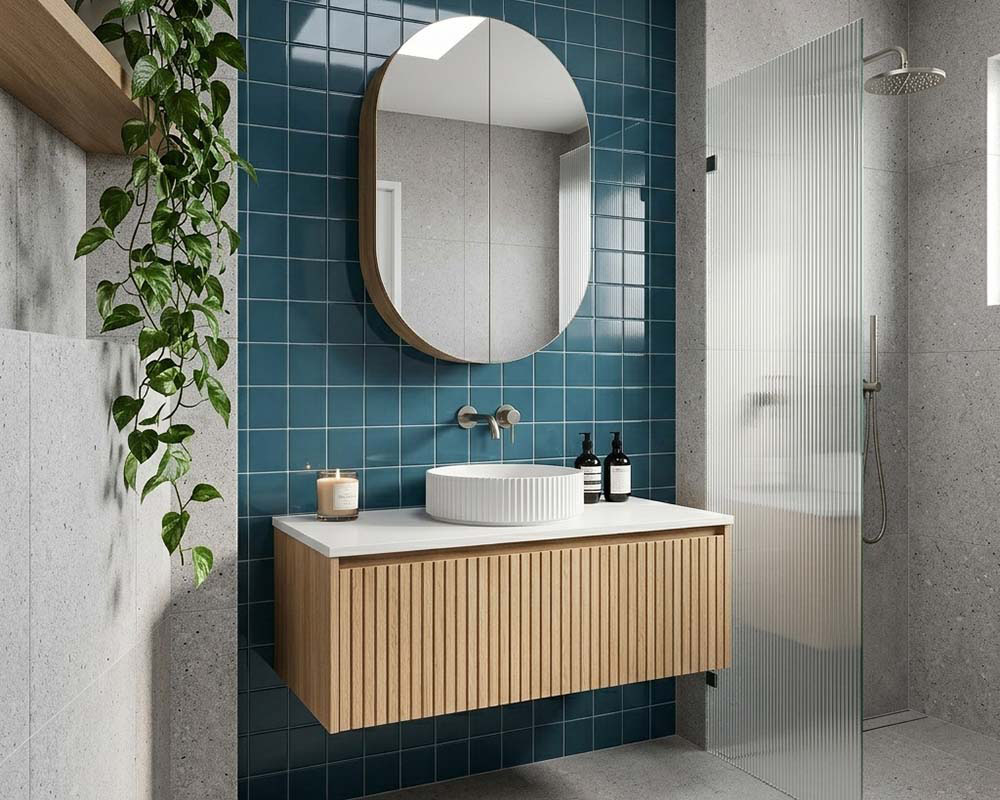
Table of Contents
- Why Tiles Matter So Much in Small Bathrooms
- Small Bathroom Tile Design Ideas That Work
- Choosing the Right Tile Size for a Small Bathroom
- Tile Layout Patterns That Make Small Spaces Feel Bigger
- Space-Saving and Practical Tiling Tips
- Common Mistakes to Avoid in Small Bathroom Tile Design
- Quick Checklist for Small Bathroom Tile Planning
- Helping You Choose the Right Tiles for Small Bathrooms
Why Tiles Matter So Much in Small Bathrooms
In small bathrooms, every design decision counts — and tile selection is no exception. Every grout line, colour transition and pattern choice can either help open up the space or make it feel more cluttered. Large, uninterrupted surfaces, lighter colours and minimal visual noise ensure the room appears as one continuous space, helping it feel larger and more open than it actually is.
Small Bathroom Tile Design Ideas That Work
1. Go Big with Large-Format Tiles
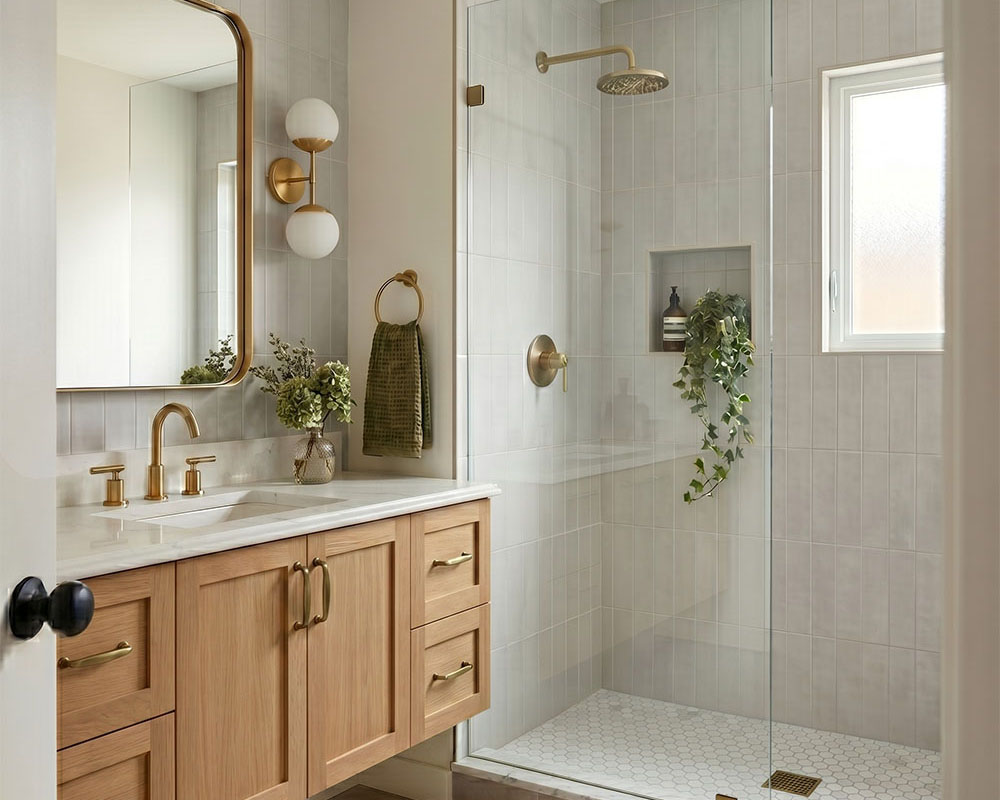
Large-format tiles often work well in small bathrooms because fewer grout lines mean less visual interruption and a cleaner, more expansive feel. Formats such as 300×300 mm, 300×600 mm and 600×600 mm are ideal for maximising the sense of space, with rectangular options helping to draw the eye along the room.
On walls, larger tiles create clean, streamlined surfaces that are easy to maintain and wipe down. When paired with rectified edges and colour-matched grout, they help achieve a smooth, more continuous finish with minimal visual breaks.
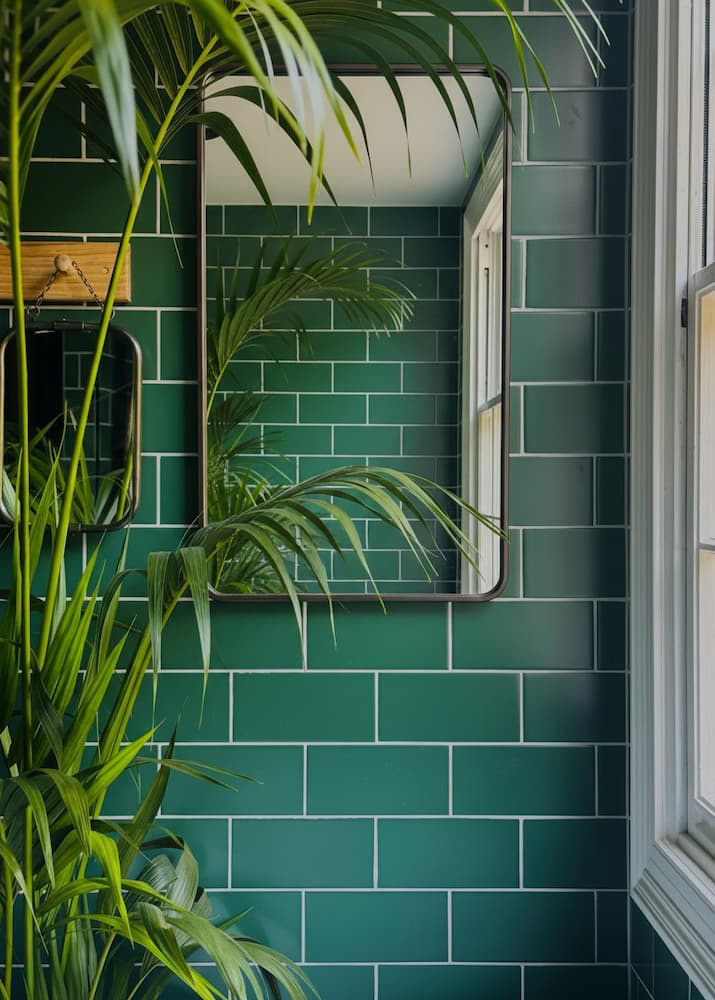
2. Use Light, Low Contrast Colour Palettes
Light, neutral tiles — such as soft whites, beiges and warm greys — help reflect both natural and artificial light around the room, which in turn makes small bathrooms feel brighter and more open. Building on this, matching the grout to the tile colour reduces visual lines and creates a more seamless finish, helping the space feel calmer and more cohesive overall.
Where contrast is introduced, it’s best used sparingly. A feature such as a niche, vanity splashback or feature wall can add interest and definition, provided it’s balanced so it doesn’t overwhelm the space or make it feel smaller.
Finish also plays a supporting role in how light behaves in the room. Gloss or lappato surfaces reflect light more effectively than matte finishes, further enhancing brightness and contributing to a greater sense of space.
3. Be Strategic with Mosaics and Small Tiles
Mosaic sheets and small-format tiles are a great way to introduce texture and pattern, but they also increase the number of grout lines across a surface. When used extensively throughout a small bathroom, this can make the space feel visually busier and more demanding to maintain.
For this reason, mosaics are often most effective when used in focused areas rather than across the entire room. Details such as a shower niche, a strip behind the vanity or a defined feature section work well, especially when balanced with larger-format tiles elsewhere to keep the overall design calm and cohesive.
4. Add Pattern Carefully
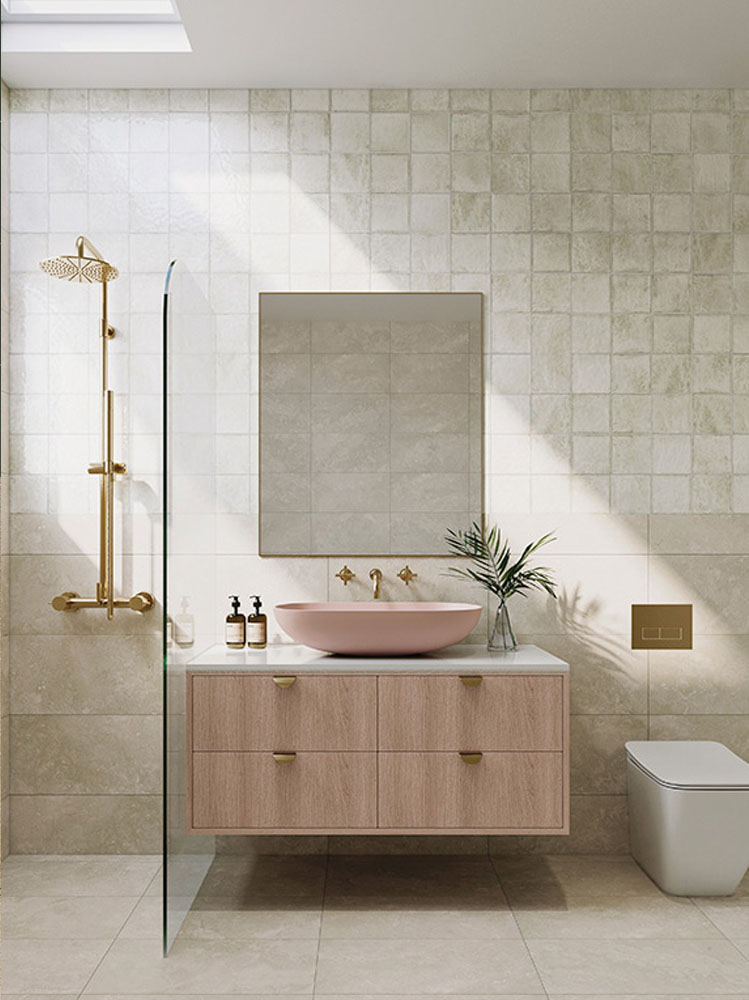
Pattern can bring personality and interest to a small bathroom, but it needs to be used thoughtfully to avoid overwhelming the space. Subtle designs — such as soft terrazzo or stone-look tiles with light veining or tonal variation — work particularly well, as they add detail without creating visual clutter.
When using a bolder pattern, it’s best to contain it within a defined area, such as a feature wall, shower niche or floor, while keeping the surrounding surfaces simple and neutral. This approach allows the pattern to stand out as a focal point while still maintaining a sense of openness and cohesion throughout the room.
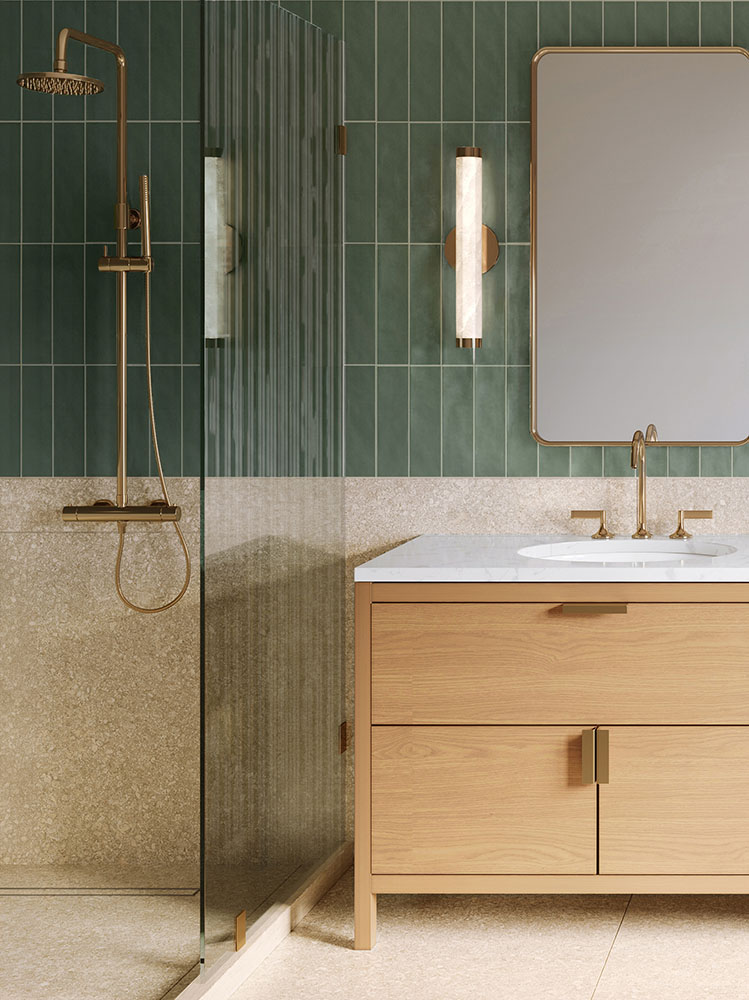
5. Run Tiles Floor-to-Ceiling Where it Counts
Floor-to-ceiling tiling in key areas, such as the shower or main feature walls, creates strong vertical lines that help a small bathroom feel taller and more open.
For a more budget-friendly approach, you can use full-height tiling in the shower area and half-height tiling elsewhere, with the remaining walls finished in a matching paint colour. This helps maintain visual consistency while keeping the overall design cohesive and balanced.
6. Complement Tile Choice with Planning of Fixtures & Fittings
In small bathroom spaces, careful layout planning is essential to ensure the room functions well and feels as open as possible. Combining the placement of fixtures and fittings with your tile selection helps maximise both space and usability.
Key considerations include:
- Storage: Use wall-mounted floating vanities, recessed niches and built-in storage to free up floor area and create a more open feel.
- In-wall cistern: Where possible, a concealed cistern can help reduce visual bulk and save space.
- Large mirror: Mirrors enhance the sense of space by reflecting light and visually expanding the room.
- Shower glass partitions: Frameless glass screens help maintain clear sightlines and an open layout. In small bathrooms, avoid full-height partition walls or shower curtains, as these can visually close in the space.
- Natural light: Maximise natural light through windows or skylights to make the room feel brighter, larger and less confined.
- Door type: Sliding or cavity sliding doors help save swing space and improve circulation. Even a reverse-swing door can make a noticeable difference in tighter layouts.
Choosing the Right Tile Size for a Small Bathroom
There is no single perfect tile size for a small bathroom. Good design is about balancing proportion, functionality and making the most of the room’s dimensions.
If you are planning a renovation or new build, a useful approach is to dry-lay a few tile options on site to confirm proportions and cut locations before committing to your selection. In general, most small bathrooms work well with a combination of medium to large floor and wall tiles, with smaller mosaics used only where they serve a practical purpose.
Choosing larger tiles doesn’t necessarily mean going so big that excessive cutting is required. As a general design guideline, many tilers aim to avoid very small cuts where possible, helping maintain a cleaner, more consistent layout without awkward or thin tile pieces.
Recommended Tile Size for Key Areas
| Area | Suggested Tile Size for Small Bathroom | Why It Works |
|---|---|---|
| Main bathroom floor | 300×300 mm, 300×600 mm or 600×600 mm porcelain | Medium to large tiles minimise the number of grout lines while still allowing falls; rectified edges with matching grout minimise visual grid. |
| Shower floor | Mosaics or small formats, alternatively large format tiles where appropriate | Smaller pieces follow falls to the drain more easily. Large format tiles can also be cut (including such install methods as envelope cuts) to create water fall to the drain. |
| Main wall areas | 300×300 mm, 300×600 mm or 600×600 mm porcelain | Rectangular formats elongate walls, suit vertical stacking and create a contemporary, streamlined look with fewer grout joints. Large format helps continuity from floor to wall, simplifying the space. |
| Feature wall or niche | Mosaics, decor tiles, or patterned 200×200 mm tiles | Adds texture or colour in a controlled area, giving interest without overwhelming the whole room. |
Balancing Tile Size with Drainage and Structure
When selecting tiles for shower floors, it’s important to choose the size carefully, as the layout needs to support proper drainage while still feeling safe and comfortable underfoot.
Smaller formats such as mosaics are a popular choice for this reason. The additional grout lines can help improve grip, and their size also makes them easier to work around drainage points and sloped surfaces, which helps achieve the required falls. The trade-off is that, while mosaics can be practical and visually appealing, the higher number of grout joints generally means more cleaning and maintenance over time.
Larger format tiles can also be used in shower areas, but they require more considered planning during installation. For example, using a single 600×600 mm tile across a 900 mm shower base may make it harder to form the correct fall without additional cutting and labour. In these cases, installers may need to cut tiles to create the necessary drainage slopes, including techniques such as envelope cuts. When well executed, larger formats can work very effectively even in compact bathrooms, offering a cleaner look with fewer grout lines and reduced ongoing maintenance.
Some homeowners prefer a continuous look by carrying the same tile from floor to wall, while others introduce contrast on the floor for added grip or visual interest. Ultimately, the right choice depends on the style you’re aiming for, as well as how much maintenance and practicality you want from the space. Larger formats tend to suit clean, contemporary designs, while smaller tiles bring more texture, detail and character.
Tile Layout Patterns That Make Small Spaces Feel Bigger
With careful planning and attention to key design principles, you can avoid costly mistakes down the track and transform your small bathroom into a space that is both functional and beautifully designed.
1. Run Tiles in the Direction You Want to Stretch
Laying rectangular floor tiles along the longest side of the bathroom helps make a small space feel longer. In a compact ensuite, this might mean laying 300×600 mm tiles lengthways from the door towards the shower. Similarly, installing wall tiles vertically rather than horizontally — such as vertical stacked subway tiles — draws the eye upward, helping to enhance the sense of height and openness in the space.
2. Keep Grout Lines Clean and Consistent
Consistent grout lines and tile alignment are especially important in small bathrooms, where uneven spacing or irregular cuts are more noticeable at close range. Matching the grout colour to the wall tiles helps create a softer, more seamless look, while slightly darker grout on floors can help disguise dirt and reduce visible wear over time.
Rectified tiles allow for narrower grout joints, helping reduce visual clutter and create a cleaner, more contemporary finish. Non-rectified tiles require wider grout joints, which can suit more traditional or handcrafted styles but may make compact spaces feel visually busier.
Using the same floor tile on walls can also help create a more cohesive look and improve the overall sense of flow throughout the bathroom.
3. Carry Flooring into the Shower
Using the same floor tile throughout the main bathroom and into a walk-in or curbless shower helps create a more seamless look and can make the space feel larger and more open. This approach works especially well when paired with a frameless glass screen and a linear drain, as both help maintain clean lines and minimise visual interruptions across the room.
Space-Saving and Practical Tiling Tips
Limit the Number of Different Tiles
Small bathroom tile ideas that feel cohesive usually stick to two or three tile types across the whole room — for example, one main floor tile, one main wall tile and one feature or mosaic. Too many colours, formats and finishes create a patchwork effect that makes the space feel smaller and more chaotic.
Prioritise Slip Resistance and Safety
For floors in wet areas, it’s important to choose tiles with a suitable slip resistance rating for the intended application. Our range includes tiles across a broad range of slip resistance classifications, from P0 through to P5, allowing you to balance safety, comfort and ease of maintenance depending on the space and level of exposure to water.
Design for Easy Cleaning
Fewer grout lines generally mean less cleaning, which is one reason large-format wall and floor tiles are so popular in busy households. Rectified porcelain tiles paired with a matching or slightly darker grout can help disguise minor stains and create a cleaner, more contemporary look.
In very small bathrooms, it’s also best to avoid heavily textured or highly embossed tiles across large areas, as they can trap soap scum and require more regular cleaning over time.
Coordinate Tiles with Fixtures and Layout
The most effective small bathroom tile layouts are planned around key fixtures such as shower screens, vanities, windows and niches, so that tile cuts are kept in less noticeable areas. Aligning grout joints with benchtops, mirror edges or window sills can also help create a more considered, custom-built feel, even in compact spaces.
Early coordination between the designer, tiler and plumber helps ensure floor wastes and linear drains sit neatly within the tile layout, reducing the need for small slivers or awkward diagonal cuts.

Common Mistakes to Avoid in Small Bathroom Tile Design
- Using too many patterns or colours: Overusing patterned tiles, feature borders or strong contrasts can quickly make a compact bathroom feel busy and visually broken up. A better approach is to choose one focal moment — such as a patterned floor or mosaic niche — and keep the surrounding tiles simple and tonal.
- Choosing dark tiles everywhere: Dark, saturated colours absorb light and can make small spaces feel more enclosed, even though they can create a strong design statement. If you prefer deeper tones, use them as accents (such as a vanity front or feature wall) and balance them with lighter tiles and good lighting.
- High-contrast grout on walls: Strong grout contrast, such as dark joints with light tiles, can create a bold graphic effect but may feel visually busy in small bathrooms. In most cases, low-contrast grout creates a more seamless finish and helps the space feel calmer and more open.
- Ignoring tile size in relation to falls and plumbing: Choosing very large tiles without considering floor falls — especially in showers — can lead to difficult installation, excessive cutting or poor drainage outcomes. Always check tile sizes against room dimensions and plumbing layout before ordering to ensure a practical, well-resolved result.
- Forgetting about scale with fixtures: Tiles or patterns that are out of scale with compact fixtures can feel unbalanced, such as oversized tiles behind a small basin with awkward cuts around the edges. Aligning tile layouts with key elements like vanity width or shower height helps create a more cohesive and considered design.
Quick Checklist for Small Bathroom Tile Planning
- Decide on the overall style first — whether calm and minimalist, classic or contemporary — then choose tiles that support that look.
- Choose a main floor and wall tile in light or mid-tone colours, then add a maximum of one feature or mosaic if desired.
- Confirm the tile size for small bathroom floors and walls by dry-laying a few pieces and checking cut locations, falls and proportions in the actual space.
- Design and plan with function in mind. Consider how the bathroom will be used day to day and let this guide the design. Carefully plan tile layouts around fixtures, drains and shower screens to create a space that feels balanced, spacious and well considered.
- Plan tile direction strategically to help visually lengthen or widen the room, and continue floor tiles into the shower wherever practical to improve flow.
- Match grout colours closely to wall tiles, and choose slightly darker, low-maintenance grout for floors to help minimise visible dirt and visual clutter.
- Always check slip ratings and tile suitability for wet areas, particularly for bathroom and shower floors.
Helping You Choose the Right Tiles for Small Bathrooms
With over 120 years of manufacturing experience, Johnson Tiles has the expertise to help guide your tile selection for a bathroom renovation or new build. Our range includes an extensive collection of bathroom tiles, from mosaics through to large-format designs, perfectly suited to small bathrooms, ensuites and shower spaces.
Book a design consultation with our team for expert guidance on selecting the right tiles, layouts and finishes to help bring your vision to life and create a bathroom that feels both practical and beautifully considered.
Choosing the right bathroom tiles is one of the most important decisions in any small bathroom renovation. Great small bathroom design is about balancing style and functionality, using thoughtful layouts, natural light, light colour palettes and appropriate tile sizing to help maximise the sense of space.
Tiles play a key role in both the appearance and practicality of a bathroom, influencing how the space looks, feels and performs over time. By selecting tiles carefully and considering how they work within the overall design, you can create a bathroom that feels cohesive, practical and visually appealing within your home.